How to build your custom CentOS image on EC2
12/07/2012 - Gérard Dethier (@gdethier)
In this post, we’ll show you how easy it is to provision a custom CentOS based machine on Amazon EC2 using a Kickstart file. With this procedure, you don’t need to find an existing AMI matching your requirements or wait for someone to build one. We’ve also used this procedure to create a vanilla ‘just-enough’ install of CentOS 6.3 and make it publicly available in all EC2 regions.
Using a kickstart file on Amazon EC2
ComodIT is able to install machines on Amazon EC2 without having to rely on a pre-installed AMI. It can execute a completely automated install of RedHat/CentOS using a kickstart file, or Debian/Ubuntu using a preseed. You can even ‘manually’ install your host, going through the install process via a secure VNC console.
This feature makes it really easy to build new images on EC2, without having to go through a painfull process of manually preparing an image off-line and then uploading it to the cloud provider.
In this case, we have used the ‘ComodIT Kickstart on EC2’ feature to build a vanilla CentOS 6.3 image, with cloud-init bundled, and make it publicly available on EC2. The next section shows you how to do this yourself, and package your own custom CentOS image. Doing so provides you with a total flexibility on things like partition tables, installed packages, etc.
Step-by-step guide
1. Pre-requisites
We assume that you already have a ComodIT account properly setup, and that you have configured it to deploy machines on your EC2 account. If not, please follow steps 1-4 of our EC2 Tutorial.
2. Create your CentOS 6.3 Distribution
Once logged in, go to the ‘Distribution’ section and click the Add button. In the dialog, fill in the fields as follow:
- Name: The name of your distribution (e.g. CentOS 6.3)
- Description: A short description (optional)
- Flavor: The distribution ‘type’, pick the Linux (Kickstart) flavor
- Kernel: The URL to the install kernel (e.g. http://ftp.heanet.ie/pub/centos/6.3/os/x86_64/images/pxeboot/vmlinuz)
- Initrd: The URL to the install image (e.g. http://ftp.heanet.ie/pub/centos/6.3/os/x86_64/images/pxeboot/initrd.img)
- Kickstart: You may upload a kickstart (see below) or leave it empty for now.
You must now edit the kickstart file. To do so, select your distribution, and go to the ‘Files’ tab in the ‘Distribution Details’ area. Click the kickstart.ks file to open and edit its content. You can paste the content of this example kickstart. The content of this kickstart is explained below.
3. Provision a host on EC2 with CentOS 6.3
Now that your distribution is ready, go to the ‘Hosts’ section, click the Add button and go through the following steps:
- Describe the host: In the host creation wizard, enter a name, a description and click next.
- Pick a platform: In the platform configuration, pick your EC2 account. The larger the instance size, the faster the install process will be. Note that the type of the instance has no impact on the AMI created afterwards.
- Pick a distribution: Pick your newly defined CentOS 6.3 distribution and click Finish
Select your newly defined host and click the Provision action from the ‘Host Actions’ menu. ComodIT will launch the provisioning of your machine, its state is changed to a little clock icon while it builds. When done, the machine will be powered off so that you can snapshot it and generate your AMI. This may take some time (5-10+ minutes depending on the instance type and configured repositories).
Note that during the install process, as you have activated the vnc option in your kickstart, and if you have opened a port in your security group to expose the vnc port 5901 from the instance to ComodIT Public IP (88.198.103.234), you can follow the progress of the install by clicking the ‘Show VNC Console’ in the ‘Host Actions’.
4. Snapshot your machine and build an AMI
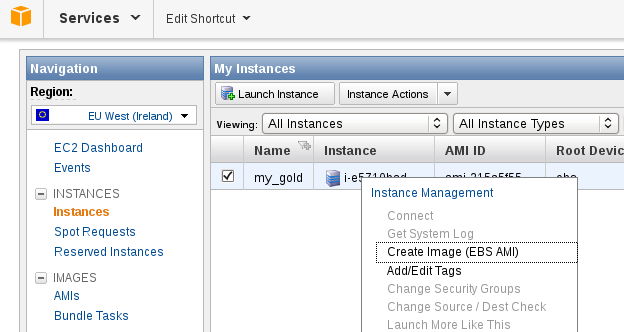
In EC2’s AWS Management Console, go to EC2 service, and display your instances list (through the menu, INSTANCES > Instances). Provisioned machine should have stopped state. Just right-click on it and choose ‘Create Image (EBS AMI)’ item in displayed contextual menu.
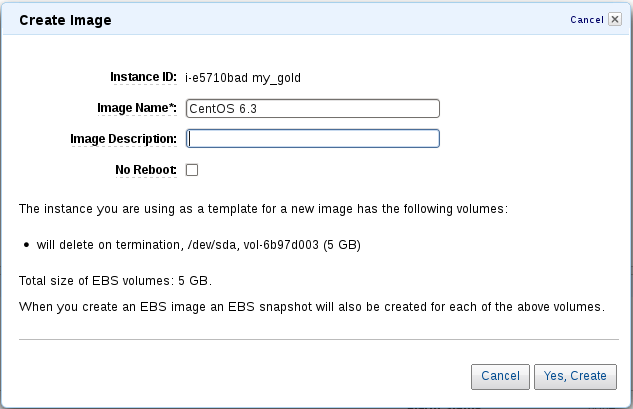
In displayed dialog, fill-in a name (e.g. CentOS 6.3) and a description (optional), let the ‘No Reboot’ checkbox unchecked and, finally, click on ‘Yes, Create’ button.
Congratulations! You should now be able to instantiate you CentOS 6.3 AMI using AWS or ComodIT.
The kickstart file
In this section, content of used kickstart is explained, piece by piece. Each snippet is preceded by a short explanation. A kickstart file allows to automate partially or fully an anaconda-based installation process. For a more general presentation of kickstart installations, see this page. The kickstart described below fully automates the installation process.
Configuration
Following options simply specify that we do an install (and not an upgrade) and that graphical install mode through VNC should be used. This allows to monitor installation using ComodIT’s VNC console.
install
vnc
Next, network is configured. On EC2, a simple DHCP configuration can be used.
network --bootproto=dhcp --device=eth0
In order to install CentOS 6.3, an install tree URL has to be specified. In this example, we chose to install from a Heanet mirror. Chosen mirror should be geographically close to provisioning host in order to minimize latency.
url --url=http://ftp.heanet.ie/pub/centos/6.3/os/x86_64/
In addition, Epel repositories are defined. This is mandatory in order to be able to install cloud-init, which automatically configures your host on first boot to integrate well with EC2 (SSH keys setup, etc.).
repo --name=epel --mirrorlist=https://mirrors.fedoraproject.org/metalink?repo=epel-6&arch=x86_64
repo --name=epel-testing --mirrorlist=https://mirrors.fedoraproject.org/metalink?repo=testing-epel6&arch=x86_64
This option simply indicates that a graphical environment must not be configured on installed host (it is indeed useless).
skipx
Some localization information such as language, keyboard layout and timezone must be set.
lang en_US
keyboard us
timezone --utc Etc/UTC
Unlike some other distributions, CentOS requires a root user. However, the philosophy of EC2 AMIs is rather to define an ‘ec2-user’ user and grant him full sudo privileges. As root user cannot be removed, a random encrypted password is associated to him (you may generate an encrypted password using for example openssl).
rootpw --iscrypted $1$h1xfuVt1$426ElReeaUreeZxAlIvCU.
At the end of kickstart install, host should be powered off as it will directly be exported as a custom AMI.
poweroff
On first boot, cloud-init will configure what still needs to be. CentOS’s first-boot agent can therefore be disabled.
firstboot --disabled
Firewall should be enabled by default. Additional open ports may be defined here. However, note that generated AMI will by default have SSH port open.
firewall --enabled
The next snippet is about disk partitioning. In short, bootloader is installed in MBR and 2 partitions are defined: one for root file system and one for swap. Note that, in order to guarantee partition’s order on disk, actual partitioning must occur in %pre section of the kickstart (see below). Otherwise, there is no strong guarantee on partition order and swap may become the first partition on the disk, causing EC2’s PV-grub not to be able to boot the machine. Following partitioning guarantees that the partition containing root file system is always the first partition on disk.
bootloader --location=mbr --append "text"
part /     --onpart=/dev/xvde1
part swap  --onpart=/dev/xvde2
Packages section
Package section contains the names of the packages to install. In this case, packages part of base CentOS install (@Base) are requested. In addition, epel repository files and cloud-init are installed. Cloud-init comes from epel-testing repository.
%packages
@Base
epel-release
cloud-init
‘Pre’ section
%pre section of a kickstart contains a shell script that will be executed before installation process. Disk is partitioned here using parted tool.
First, the disk to partition is selected (/dev/xvde on EC2).
%pre
REAL_DISK=/dev/xvde
Second, a little clean-up is done (clearing MBR and setting of partition table type).
dd if=/dev/zero of=$REAL_DISK bs=512 count=1
parted -s $REAL_DISK mklabel msdos
Third, sizes of partitions is calculated in function of disk size. Actually, starting point of swap partition (coming second) is computed so ‘root’ partition ends at this point and swap partition starts at this point.
TOTAL=`parted -s $REAL_DISK unit mb print free | grep $REAL_DISK | awk '{print $3}' | cut -d "M" -f1`
let SWAP_START=$TOTAL-512
Finally, partitions are actually created. Note that ext3 file system type will be overridden at install time as partitions are reformatted (CentOS uses ext4 by default).
parted -s $REAL_DISK mkpart primary ext3 0 $SWAP_START
parted -s $REAL_DISK mkpart primary $SWAP_START $TOTAL
‘Post’ section
As for %pre section, %post section is also a shell script executed after install process completed.
First, eth0 configuration file is overwritten in order to remove references to hardware address of the NIC as it changes each time the AMI is instantiated. Also, udev rule regarding eth0 mapping should be deleted.
%post
cat << EOF > /etc/sysconfig/network-scripts/ifcfg-eth0
DEVICE="eth0"
BOOTPROTO="dhcp"
IPV6INIT="yes"
MTU="1500"
NM_CONTROLLED="yes"
ONBOOT="yes"
TYPE="Ethernet"
EOF

rm -f /etc/udev/rules.d/70-persistent-net.rules
Second, SSH login with root user is disabled.
cat >> /etc/ssh/sshd_config << EOF
PermitRootLogin no
PasswordAuthentication no
UseDNS no
EOF
Third, ec2-user is created and added to sudoers list with no password.
/usr/sbin/useradd ec2-user
/bin/echo -e 'ec2-user\tALL=(ALL)\tNOPASSWD: ALL' >> /etc/sudoers
Finally, a banner to be displayed on SSH login is set.
cat >> /etc/ssh/sshd_banner << EOF

-------------------------------------------------------------------------------
# This image has been automatically created with ComodIT - https://comodit.com #
#                                                                             #
# If you want to create your own fully customized EC2 image, register at      #
# https://comodit.com.                                                         #
-------------------------------------------------------------------------------

EOF

sed -i "s|#Banner none|Banner /etc/ssh/sshd_banner|" /etc/ssh/sshd_config
blog comments powered by Disqus
Recent Posts
-
Three Cool Use Cases for Docker within ComodIT
10 Sep 2013 by Laurent Eschenauer
-
Install server applications in one click directly from the web
15 May 2013 by Laurent Eschenauer
-
Introducing Combox: a simple tool to deploy virtualized development environments
18 Apr 2013 by Laurent Eschenauer